
Scrapyを使用してPythonでWebスクレイピングをしてみます。
Scrapyとは、高速なオープンソースのWebクローリングフレームワークで、XPathに基づくセレクタの助けを借りてWebページからデータを抽出することができるものです。
なお、Pythonの標準ライブラリではありませんので、事前にインストールする必要があります。
■Python
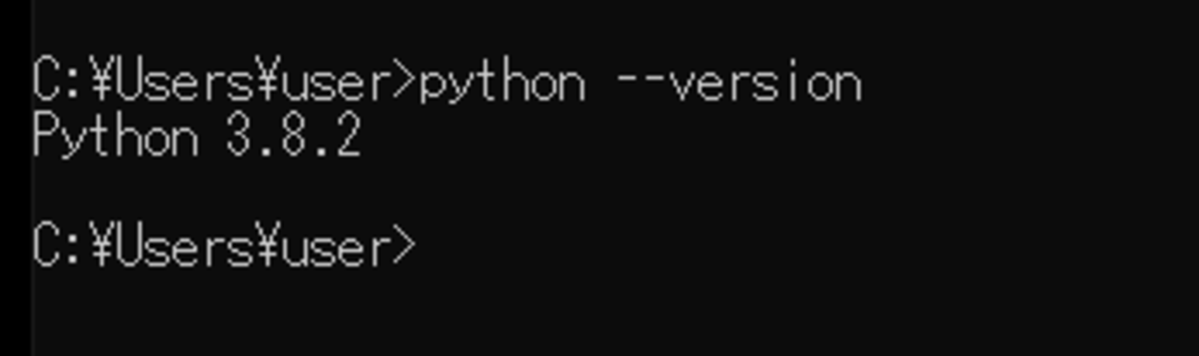
今回のPythonのバージョンは、「3.8.2」を使用しています。(Windows10)
■Scrapyをインストールする
まずは、Scrapyのインストールを行います。Windowsのコマンドプロンプトを起動します。
pip install scrapy
起動後、上記のコマンドを入力し、Enterキーを押します。
Collecting scrapy
Downloading Scrapy-2.4.0-py2.py3-none-any.whl (239 kB)
|████████████████████████████████| 239 kB 1.3 MB/s
Collecting Twisted>=17.9.0
Downloading Twisted-20.3.0.tar.bz2 (3.1 MB)
|████████████████████████████████| 3.1 MB 6.4 MB/s
Collecting service-identity>=16.0.0
Downloading service_identity-18.1.0-py2.py3-none-any.whl (11 kB)
Collecting protego>=0.1.15
Downloading Protego-0.1.16.tar.gz (3.2 MB)
|████████████████████████████████| 3.2 MB 6.4 MB/s
Collecting zope.interface>=4.1.3
Downloading zope.interface-5.2.0-cp38-cp38-win_amd64.whl (196 kB)
|████████████████████████████████| 196 kB 3.3 MB/s
Collecting itemloaders>=1.0.1
Downloading itemloaders-1.0.4-py3-none-any.whl (11 kB)
Collecting pyOpenSSL>=16.2.0
Downloading pyOpenSSL-19.1.0-py2.py3-none-any.whl (53 kB)
|████████████████████████████████| 53 kB 3.8 MB/s
Collecting queuelib>=1.4.2
Downloading queuelib-1.5.0-py2.py3-none-any.whl (13 kB)
Collecting cssselect>=0.9.1
Downloading cssselect-1.1.0-py2.py3-none-any.whl (16 kB)
Collecting parsel>=1.5.0
Downloading parsel-1.6.0-py2.py3-none-any.whl (13 kB)
Collecting PyDispatcher>=2.0.5
Downloading PyDispatcher-2.0.5.tar.gz (34 kB)
Collecting lxml>=3.5.0; platform_python_implementation == “CPython”
Downloading lxml-4.6.1-cp38-cp38-win_amd64.whl (3.5 MB)
|████████████████████████████████| 3.5 MB 6.4 MB/s
Collecting cryptography>=2.0
Downloading cryptography-3.2.1-cp38-cp38-win_amd64.whl (1.5 MB)
|████████████████████████████████| 1.5 MB 3.3 MB/s
Collecting w3lib>=1.17.0
Downloading w3lib-1.22.0-py2.py3-none-any.whl (20 kB)
Collecting itemadapter>=0.1.0
Downloading itemadapter-0.2.0-py3-none-any.whl (9.3 kB)
Collecting constantly>=15.1
Downloading constantly-15.1.0-py2.py3-none-any.whl (7.9 kB)
Collecting incremental>=16.10.1
Using cached incremental-17.5.0-py2.py3-none-any.whl (16 kB)
Collecting Automat>=0.3.0
Downloading Automat-20.2.0-py2.py3-none-any.whl (31 kB)
Collecting hyperlink>=17.1.1
Downloading hyperlink-20.0.1-py2.py3-none-any.whl (48 kB)
|████████████████████████████████| 48 kB 2.3 MB/s
Collecting PyHamcrest!=1.10.0,>=1.9.0
Downloading PyHamcrest-2.0.2-py3-none-any.whl (52 kB)
|████████████████████████████████| 52 kB 3.8 MB/s
Collecting attrs>=19.2.0
Downloading attrs-20.3.0-py2.py3-none-any.whl (49 kB)
|████████████████████████████████| 49 kB 3.4 MB/s
Collecting pyasn1-modules
Downloading pyasn1_modules-0.2.8-py2.py3-none-any.whl (155 kB)
|████████████████████████████████| 155 kB 6.8 MB/s
Collecting pyasn1
Downloading pyasn1-0.4.8-py2.py3-none-any.whl (77 kB)
|████████████████████████████████| 77 kB 5.5 MB/s
Requirement already satisfied: six in c:\pg\python38\lib\site-packages (from protego>=0.1.15->scrapy) (1.15.0)
Requirement already satisfied: setuptools in c:\pg\python38\lib\site-packages (from zope.interface>=4.1.3->scrapy) (47.1.0)
Collecting jmespath>=0.9.5
Using cached jmespath-0.10.0-py2.py3-none-any.whl (24 kB)
Collecting cffi!=1.11.3,>=1.8
Downloading cffi-1.14.3-cp38-cp38-win_amd64.whl (179 kB)
|████████████████████████████████| 179 kB 3.2 MB/s
Collecting idna>=2.5
Downloading idna-2.10-py2.py3-none-any.whl (58 kB)
|████████████████████████████████| 58 kB …
Collecting pycparser
Downloading pycparser-2.20-py2.py3-none-any.whl (112 kB)
|████████████████████████████████| 112 kB 3.2 MB/s
Using legacy setup.py install for Twisted, since package ‘wheel’ is not installed.
Using legacy setup.py install for protego, since package ‘wheel’ is not installed.
Using legacy setup.py install for PyDispatcher, since package ‘wheel’ is not installed.
Installing collected packages: zope.interface, constantly, incremental, attrs, Automat, idna, hyperlink, PyHamcrest, Twisted, pycparser, cffi, cryptography, pyasn1, pyasn1-modules, service-identity, protego, w3lib, cssselect, lxml, parsel, itemadapter, jmespath, itemloaders, pyOpenSSL, queuelib, PyDispatcher, scrapy
Running setup.py install for Twisted … done
Running setup.py install for protego … done
Running setup.py install for PyDispatcher … done
Successfully installed Automat-20.2.0 PyDispatcher-2.0.5 PyHamcrest-2.0.2 Twisted-20.3.0 attrs-20.3.0 cffi-1.14.3 constantly-15.1.0 cryptography-3.2.1 cssselect-1.1.0 hyperlink-20.0.1 idna-2.10 incremental-17.5.0 itemadapter-0.2.0 itemloaders-1.0.4 jmespath-0.10.0 lxml-4.6.1 parsel-1.6.0 protego-0.1.16 pyOpenSSL-19.1.0 pyasn1-0.4.8 pyasn1-modules-0.2.8 pycparser-2.20 queuelib-1.5.0 scrapy-2.4.0 service-identity-18.1.0 w3lib-1.22.0 zope.interface-5.2.0
Enterキーを押すと、インストールが開始され、「Successfully installed」と表示されます。これが表示されれば、正常にインストールは完了となります。
■Scrapyを使用しWebページからデータを抽出する
■Scrapyプロジェクトを作成する
scrapy startproject tutorial
まず、Scrapyを使用しWebページからデータを抽出を行いますが、その前にScrapyプロジェクトを作成します。コマンドプロンプトで上記のコマンドを入力し、Enterキーを押します。作成されるプロジェクト名は「tutorial」になります。
New Scrapy project ‘tutorial’, using template directory ‘c:\pg\python38\lib\site-packages\scrapy\templates\project’, created in:
C:\Users\user\tutorialYou can start your first spider with:
cd tutorial
scrapy genspider example example.com
Enterキーを押すと、上記のメッセージが出力され、「created in:」に表示されている場所に新しいScrapyプロジェクトが作成されます。
C:\Users\user>cd tutorial
作成後、cdコマンドで「tutorial」プロジェクトに移動するため、Enterキーを押します。
scrapy genspider wiki wikipedia.org
Enterキーを押した後に、Webページを抽出するためにスパイダーを生成しますので、上記のコマンドを入力します。「genspider」の後にスパイダーの名前、対象ドメインを記述します。今回はWikipediaのページを抽出してみますので、スパイダーの名前は「wiki」で対象ドメインは「wikipedia.org」としてます。入力後、Enterキーを押します。
Created spider ‘wiki’ using template ‘basic’ in module:
{spiders_module.__name__}.{module}
Enterキーを押すと、上記のメッセージが表示され、スパイダーが生成されます。テンプレートは「basic」が指定されます。
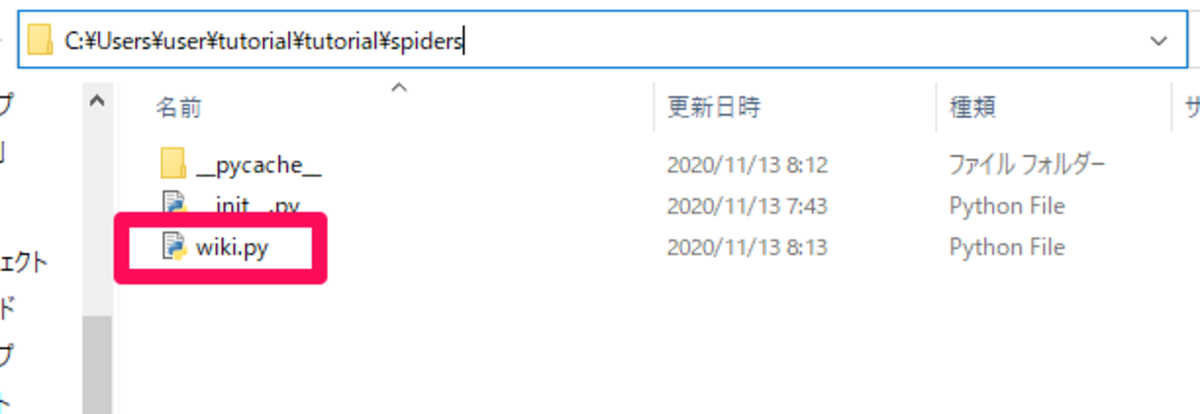
生成後、今回「C:\Users\user\tutorial(フォルダパス)」という場所にScrapyプロジェクトが作成されていますので確認し、さらに「C:\Users\user\tutorial\tutorial\spiders」というフォルダに「wiki.py」という生成されたスパイダー名のpy形式のファイルがあります。これをコード・エディターで開きます。
■コード
import scrapy


class WikiSpider(scrapy.Spider):
    name = 'wiki'
    allowed_domains = ['wikipedia.org']
    start_urls = ['http://wikipedia.org/']

    def parse(self, response):
        pass
コード・エディターで開くと上記のようになっていますので、これを編集します。
■コード
import scrapy


class WikiSpider(scrapy.Spider):
    name = 'wiki'
    allowed_domains = ['wikipedia.org']
    start_urls = ['https://ja.wikipedia.org/wiki/Python']

    def parse(self, response):
        sel = scrapy.Selector(response)
        sites = sel.xpath('//boda/div')
        for site in sites:
            title = site.xpath('//h1//text()').extract()
            subtitle = site.xpath('//h2/span/text()').extract()
            bold = site.xpath('//p/b').extract()
            links = site.xpath('//a/@href').extract()

        yield {
            'title': title,
            'subtitle': subtitle,
            'bold': bold,
            'links': links,
今回は、上記のように編集して、日本のWikipediaのPythonのページ(https://ja.wikipedia.org/wiki/Python)内の「title」、「subtitle」、「bold」、「links」データを抽出してみます。編集後、コード・エディター上で保存します。
■実行
C:\Users\user\tutorial>scrapy crawl wiki
生成されたスパイダーでWebスクレイピングを行うためには、コマンドプロンプトで上記のコマンドを入力し、Enterキーを押します。今回は「wiki」というスパイダーでWebページのクロールを開始します。
[scrapy.utils.log] INFO: Scrapy 2.4.0 started (bot: tutorial)
[scrapy.core.engine] INFO: Spider closed (finished)
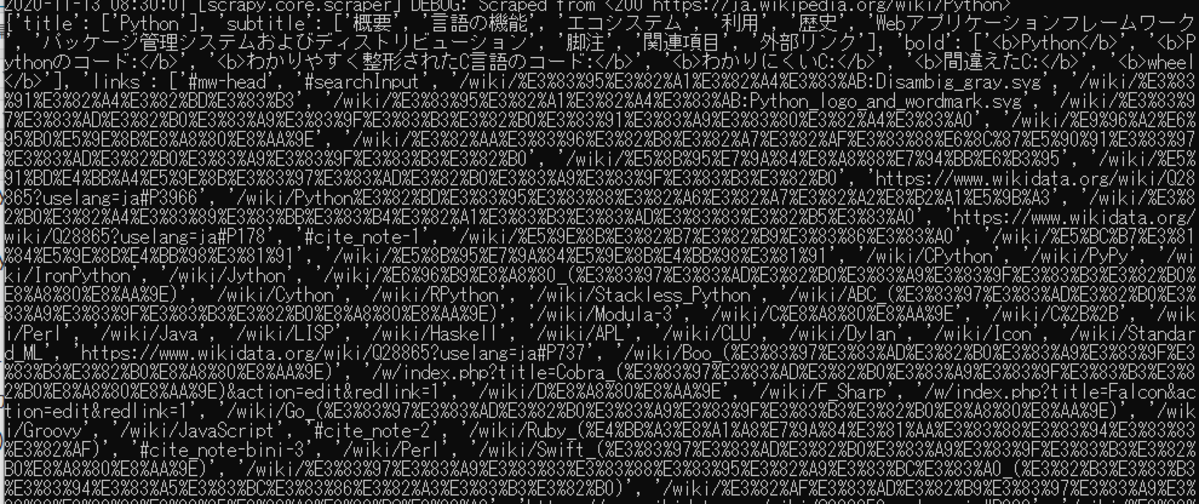
Enterキーを押すと、スパイダーがクロールを開始(Scrapy started)し、指定されたドメインのページ内からデータを抽出し、出力してくれます。クロールが終了すると、「 Spider closed (finished)」と表示されます。

コメント