
Serverless Frameworkを用いてテンプレートを作成しPython関数を呼び出してみます。
今回は、Serverless Frameworkを用いてテンプレートを作成しPython関数を呼び出してみますが、その前にシステムにawscliをインストールして設定しておく必要があります。さらに、AWSクレデンシャル(ユーザーの認証情報)を設定する必要があります。設定の際は、こちらが参考になるかと思います。
また、NodeとNPMをインストールする必要があります。
■PC環境
>Windows 10

>npm –version
8.3.1
>node –version
v16.14.0
>nodeserverless –version
Framework Core: 3.19.0
Plugin: 6.2.2
SDK: 4.3.2
>aws –version
aws-cli/2.5.6 Python/3.9.11 Windows/10 exe/AMD64 prompt/off
■プロジェクトディレクトリを作成する
今回は、まずはディレクトリを作成します。
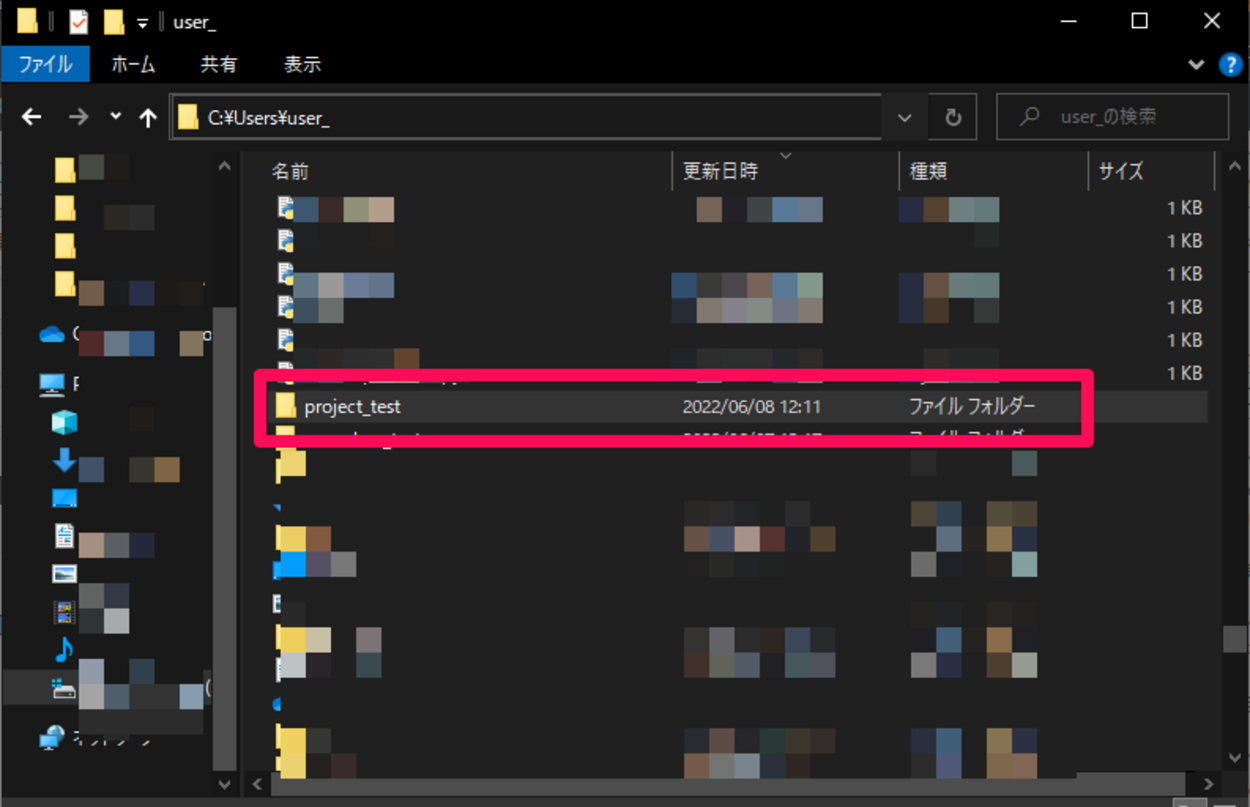
今回は「C:\Users\user_(フォルダパス)」内に「project_test」というディレクトリを作成しました。
■Pythonベースのサーバーレステンプレートを作成する
作成後、Windows10のコマンドプロンプトを起動します。
C:\Users\user_>cd project_test
起動後、上記のコマンドを入力し、Enterキーを入力します。cdコマンドで作成した「project_test」ディレクトリに移動します。
C:\Users\user_\project_test> serverless create --template aws-python --path project_test
移動後、上記のコマンドを入力し、Enterキーを入力します。–templateコマンドでaws-pythonというPythonベースのサーバーレステンプレートを作成します。–pathコマンドでサーバーレステンプレートが置かれるディレクトリ「project_test」を新しく作成するために指定します。
Enterキーを押すと「Setting up a new project」と出力され、新しいプロジェクトの設定が開始されます。しばらくすると「Project successfully created in “project_test” from “aws-python” template」と出力され、プロジェクトの作成が完了します。

完了後、「C:\Users\user_\project_test(フォルダパス)」を確認すると、Serverless Frameworkを用いて作成された「project_test」ディレクトリが確認できました。

確認後、この「project_test」ディレクトリ内を確認してみます。確認すると、「.gitignore」、「handler.py」、「serverless.yml」という3つのファイルが生成されていることが確認できました。handler.pyは、ラムダにデプロイされるPythonコードが含まれており、serverless.ymlは、与えられたラムダ関数にどのように、どんなイベントを関連付けるかをServerless Frameworkに伝える設定が含まれています。
なお、handler.pyはどのようなコードが含まれているのかについては下記になります。
■コード
import json


def hello(event, context):
    body = {
        "message": "Go Serverless v1.0! Your function executed successfully!",
        "input": event
    }

    response = {
        "statusCode": 200,
        "body": json.dumps(body)
    }

    return response

    # Use this code if you don't use the http event with the LAMBDA-PROXY
    # integration
    """
    return {
        "message": "Go Serverless v1.0! Your function executed successfully!",
        "event": event
    }
    """
def文を用いてhelloという関数が定義されており、関数を呼び出した時に、bodyのmessageなどがreturnとして返されるものになっています。
■基本的なサービスをAWSにデプロイする
「project_test」ディレクトリ内を確認後、基本的なサービスをAWSにデプロイします。
C:\Users\user_\project_test>cd project_test
Windows10のコマンドプロンプト上で、「C:\Users\user_\project_test(フォルダパス)」から、さらに「project_test」ディレクトリ内に移動するために、上記のコマンドを入力し、Enterキーを押します。
C:\Users\user_\project_test>serverless deploy
移動後、上記のコマンドを入力し、Enterキーを入力します。deployコマンドでAWSにデプロイします。
Warning: Invalid configuration encountered
  at 'provider.runtime': must be equal to one of the allowed values [dotnet6, dotnetcore3.1, go1.x, java11, java8, java8.al2, nodejs12.x, nodejs14.x, nodejs16.x, provided, provided.al2, python3.6, python3.7, python3.8, python3.9, ruby2.7]

Learn more about configuration validation here: http://slss.io/configuration-validation

Deploying project-test to stage dev (us-east-1)

× Stack project-test-dev failed to deploy (98s)
Environment: win32, node 16.14.0, framework 3.19.0, plugin 6.2.2, SDK 4.3.2
Credentials: Local, "default" profile
Docs:        docs.serverless.com
Support:     forum.serverless.com
Bugs:        github.com/serverless/serverless/issues

Error:
CREATE_FAILED: HelloLambdaFunction (AWS::Lambda::Function)
Resource handler returned message: "The runtime parameter of python2.7 is no longer supported for creating or updating AWS Lambda functions. We recommend you use the new runtime (python3.9) while creating or updating functions. (Service: Lambda, Status Code: 400, Request ID: f14c699d-c997-4179-9490-398d81f85285)" (RequestToken: e6ffe68e-e871-9b88-1b2b-35bb91d196a5, HandlerErrorCode: InvalidRequest)

View the full error: https://us-east-1.console.aws.amazon.com/cloudformation/home?region=us-east-1#/stack/detail?stackId=arn%3Aaws%3Acloudformation%3Aus-east-1%*********

1 deprecation found: run 'serverless doctor' for more details
Enterキーを押すと、デプロイが開始されましたが、上記のエラーが出力されました。出力された内容を確認し、問題を解決してみます。
Serverless Frameworkを用いて作成された「project_test」ディレクトリ内に「serverless.yml」が存在しますので、こちらをコードエディタなどで開きます。
■コード
provider:
  name: aws
  runtime: python2.7
開くと、上記のコードが存在しますので「runtime: python2.7」から「runtime: python3.9」にコードを変更しファイルを保存します。
C:\Users\user_\project_test>serverless deploy
保存後、再度上記のコマンドを入力し、Enterキーを入力します。deployコマンドでAWSにデプロイします。
✔ Service deployed to stack project-test-dev (71s)

functions:
  hello: project-test-dev-hello (389 B)

Toggle on monitoring with the Serverless Dashboard: run "serverless"
Enterキーを押すと、「Service deployed to stack project-test-dev」と出力されました。先程のようなエラーは出力されず、デプロイが完了となりました。
■Python関数を呼び出す
完了後、Python関数を呼び出してみます。
C:\Users\user_\project_test\project_test>serverless invoke -f hello -l
Windows10のコマンドプロンプト上で、上記のコマンドを入力し、Enterキーを押します。「invoke -f」コマンドで呼び出す関数を指定します。今回はhandler.py内のhello関数を指定します。
{
"statusCode": 200,
"body": "{\"message\": \"Go Serverless v1.0! Your function executed successfully!\", \"input\": {}}"
}
--------------------------------------------------------------------
START
END RequestId: *****-****-***-***-*****
END Duration: 0.92 ms Memory Used: 36 MB

Toggle on monitoring with the Serverless Dashboard: run "serverless"
Enterキーを押すと、デプロイした関数を呼び出し、returnを出力させることができました。
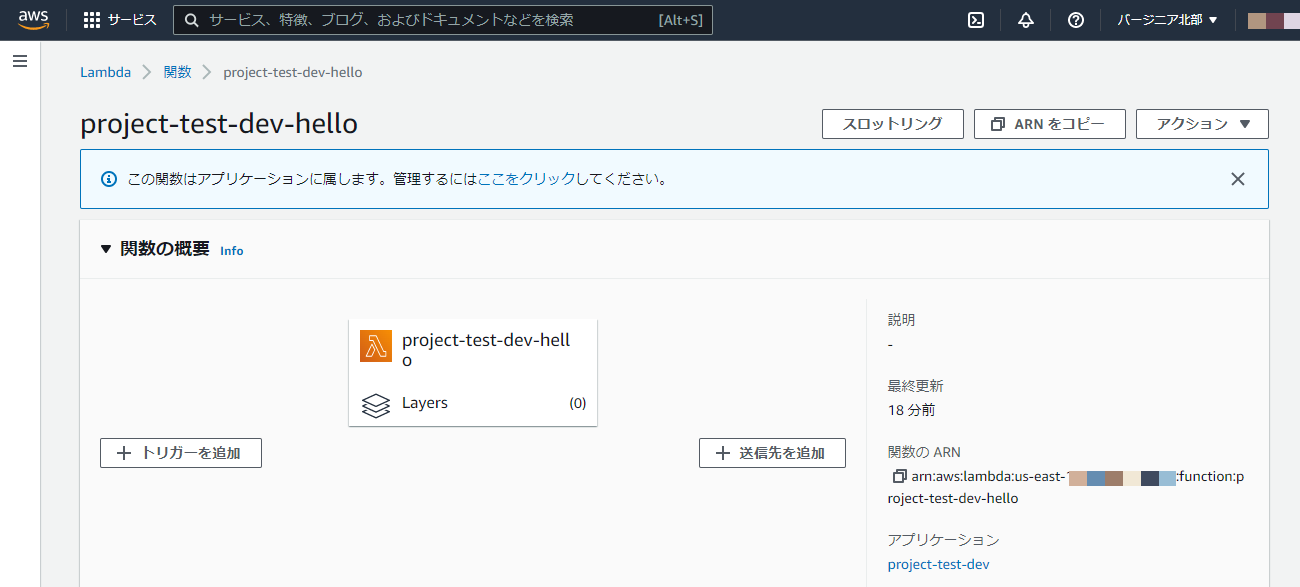
なお、「AWS マネジメントコンソール」にログインし、サービスから「Lambda」を選択すると、今回AWSにデプロイした「project-test-dev-hello」という関数が確認できました。

コメント