PythonでSeleniumをベースにした軽量なブラウザ自動化「Helium」を使用してみます。
Helium(https://github.com/mherrmann/selenium-python-helium)は、Seleniumを元にした軽量なブラウザ自動化のライブラリです。Seleniumでは、Webページの要素を識別するために、HTML ID、XPath、CSSセレクタを使用する必要がありますがHeliumでは、ユーザーに見えるラベルで要素を参照することができます。結果、Heliumのスクリプトは同じSeleniumのスクリプトと比べると、通常30~50%短くできます。
Heliumを使用する際は、ChromeかFirefoxのWebブラウザのインストールが必要となります。
※Heliumのドキュメント(https://selenium-python-helium.readthedocs.io/en/latest/index.html)
■Python
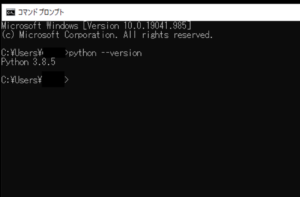
今回のPythonのバージョンは、「3.8.5」を使用しています。(Windows10)(pythonランチャーでの確認)
■Heliumをインストールする
それでは、Heliumをインストールするために、今回はpipを経由してインストールを行うので、まずWindowsのコマンドプロンプトを起動します。
pip install Helium
起動後、上記のコマンドを入力し、Enterキーを押します。
なお、今回は、pythonランチャーを使用しており、Python Version 3.8.5にインストールを行うために、pipを使う場合にはコマンドでの切り替えを行います。
py -3.8 -m pip install Helium
切り替えるために、上記のコマンドを入力し、Enterキーを押します。
Defaulting to user installation because normal site-packages is not writeable
Collecting Helium
Downloading helium-3.0.7.tar.gz (26.1 MB)
|████████████████████████████████| 26.1 MB 6.4 MB/s
Collecting selenium==3.141.0
Downloading selenium-3.141.0-py2.py3-none-any.whl (904 kB)
|████████████████████████████████| 904 kB 3.2 MB/s
Requirement already satisfied: urllib3 in c:\users\user_\appdata\roaming\python\python38\site-packages (from selenium==3.141.0->Helium) (1.26.5)
Using legacy setup.py install for Helium, since package 'wheel' is not installed.
Installing collected packages: selenium, Helium
Running setup.py install for Helium ... done
Successfully installed Helium-3.0.7 selenium-3.141.0
Enterキーを押すと、インストールが開始され、上記のように「Successfully installed」と表示されます。これが表示されれば、Heliumが正常にインストールされたことになります。
なお、今回はHeliumのバージョン3.0.7をインストールしました。
■Heliumを使用し自動でWebブラウザを起動しウィンドウを開く
インストール完了後、Heliumを使用し自動でWebブラウザを起動しウィンドウを開くスクリプトを書いていきます。
■コード
from helium import *
start_chrome()
Heliumを使用し自動でWebブラウザを起動しウィンドウを開くためには、importでHeliumモジュールを呼び出します。その後に、start_chrome()関数を使用します。括弧内には何も引数,パラメーターとして渡しません。なお、今回使用するstart_chrome()関数は、Webブラウザであるchromeを自動化するために使用しています。firefoxを使用する場合は、start_firefox()関数を使用する。
これで自動でWebブラウザを起動しウィンドウを開くことができます。コードはとても短いです。
■実行
このスクリプトを「hel_web.py」という名前で保存し、コマンドプロンプトから実行してみます。
Traceback (most recent call last):
File “C:\Users\user_\AppData\Roaming\Python\Python38\site-packages\selenium\webdriver\common\service.py”, line 72, in start
self.process = subprocess.Popen(cmd, env=self.env,
File “C:\Program Files\Python38\lib\subprocess.py”, line 854, in __init__
self._execute_child(args, executable, preexec_fn, close_fds,
File “C:\Program Files\Python38\lib\subprocess.py”, line 1307, in _execute_child
hp, ht, pid, tid = _winapi.CreateProcess(executable, args,
FileNotFoundError: [WinError 2] 指定されたファイルが見つかりません。During handling of the above exception, another exception occurred:
Traceback (most recent call last):
File “C:\Users\user_\AppData\Roaming\Python\Python38\site-packages\helium\_impl\__init__.py”, line 102, in _start_chrome_driver
result = Chrome(options=chrome_options)
File “C:\Users\user_\AppData\Roaming\Python\Python38\site-packages\selenium\webdriver\chrome\webdriver.py”, line 73, in __init__
self.service.start()
File “C:\Users\user_\AppData\Roaming\Python\Python38\site-packages\selenium\webdriver\common\service.py”, line 81, in start
raise WebDriverException(
selenium.common.exceptions.WebDriverException: Message: ‘chromedriver’ executable needs to be in PATH. Please see https://sites.google.com/a/chromium.org/chromedriver/homeDuring handling of the above exception, another exception occurred:
Traceback (most recent call last):
File “hel_web.py”, line 3, in <module>
start_chrome()
File “C:\Users\user_\AppData\Roaming\Python\Python38\site-packages\helium\__init__.py”, line 63, in start_chrome
return _get_api_impl().start_chrome_impl(url, headless, options)
File “C:\Users\user_\AppData\Roaming\Python\Python38\site-packages\helium\_impl\__init__.py”, line 97, in start_chrome_impl
chrome_driver = self._start_chrome_driver(headless, options)
File “C:\Users\user_\AppData\Roaming\Python\Python38\site-packages\helium\_impl\__init__.py”, line 106, in _start_chrome_driver
result = Chrome(options=chrome_options, executable_path=driver_path)
File “C:\Users\user_\AppData\Roaming\Python\Python38\site-packages\selenium\webdriver\chrome\webdriver.py”, line 76, in __init__
RemoteWebDriver.__init__(
File “C:\Users\user_\AppData\Roaming\Python\Python38\site-packages\selenium\webdriver\remote\webdriver.py”, line 157, in __init__
self.start_session(capabilities, browser_profile)
File “C:\Users\user_\AppData\Roaming\Python\Python38\site-packages\selenium\webdriver\remote\webdriver.py”, line 252, in start_session
response = self.execute(Command.NEW_SESSION, parameters)
File “C:\Users\user_\AppData\Roaming\Python\Python38\site-packages\selenium\webdriver\remote\webdriver.py”, line 321, in execute
self.error_handler.check_response(response)
File “C:\Users\user_\AppData\Roaming\Python\Python38\site-packages\selenium\webdriver\remote\errorhandler.py”, line 242, in check_response
raise exception_class(message, screen, stacktrace)
selenium.common.exceptions.SessionNotCreatedException: Message: session not created: This version of ChromeDriver only supports Chrome version 89
Current browser version is 91.0.4472.124 with binary path C:\Program Files\Google\Chrome\Application\chrome.exe
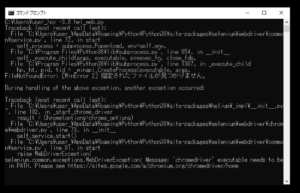
実行してみると、Webブラウザ(Chrome)は起動したものの、一瞬でウインドウが閉じて、ERRORを出力。
原因を調べてみると、「chromedriver.exe」のバージョンが、現在使用しているGoogleChromeのバージョンに対応していないために発生するERRORだと判明しました。
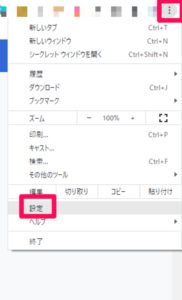
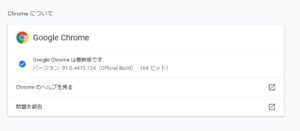
判明後、GoogleChromeを起動し、ウインドウ上部にあるメニューボタンをクリックします。クリック後、メニューが表示されるので、「設定」をクリックします。
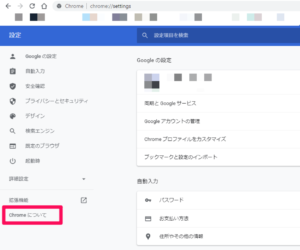
クリック後、「設定」から「Chromeについて」をクリックします。
クリックすると、現在使用しているGoogleChromeのバージョンが表示されます。今回使用しているのは、「バージョン: 91.0.4472.124(Official Build) (64 ビット)」です。この情報をメモしておきます。
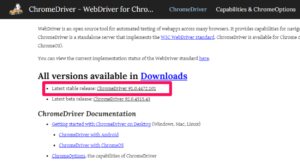
メモ後、「ChromeDriver – WebDriver for Chrome(https://chromedriver.chromium.org/)」にアクセスします。
アクセスすると、「All versions available in Downloads(すべてのバージョンがダウンロード可能です。)」という項目があるので、「Downloads」をクリックし、GoogleChromeのバージョン「「バージョン: 91.0.4472.124(Official Build) (64 ビット)」」に近いChromeDriverを探します。今回は「Latest stable release: ChromeDriver 91.0.4472.101」と表記されているバージョン 91.0.4472.101が近いので「ChromeDriver 91.0.4472.101」をクリックします。
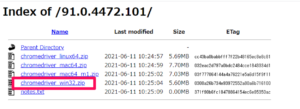
クリックすると、ChromeDriverが保管されているページに移動します。移動後、今回はWindowsのGoogleChromeなので、「chromedriver_win32.zip」をクリックします。クリックすると、ファイルのダウンロードが開始されます。
しばらくするとWebブラウザで指定されている保存場所に「chromedriver_win32.zip」がダウンロードされます。その後、このファイルを解凍・展開します。
解凍・展開すると、フォルダ内に「chromedriver.exe」というファイルが入っています。このファイルをコピーします。
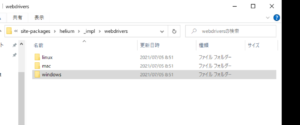
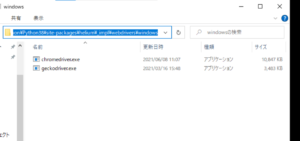
コピー後、「C:\Users\(ユーザー名)\AppData\Roaming\Python\Python38\site-packages\helium\_impl\webdrivers」に移動します。移動するとディレクトリ内に「windows」のフォルダがあるのでこちらをクリックします。
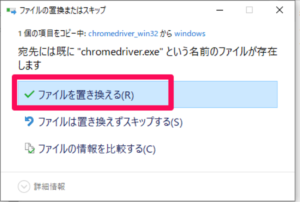
クリックすると、フォルダ内に「chromedriver.exe」が入っています。入っていますので、先ほどコピーした「chromedriver.exe」を貼り付けて、ファイルを置き換えします。
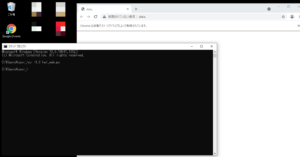
置き換え後、「hel_web.py」というスクリプトを実行します。実行してみると、自動でWebブラウザを起動しウィンドウを開くことができました。ウインドウ内では「Chromeは自動テストソフトウェアによって制御されています。」されて、Pythonによる自動化で起動していることが確認できます。
■自動でWebブラウザを起動しGoogle検索を表示、キーワード検索を行う
確認後、自動でWebブラウザを起動しGoogle検索を表示、キーワード検索を行うスクリプトを書いてみます。
■コード
from helium import *
start_chrome('google.com?hl=ja')
write('たこやき')
press(ENTER)
importでHeliumモジュールを呼び出します。その後に、start_chrome()関数を使用します。括弧内には引数,パラメーターとして、アクセスするWebサイトのURLを渡します。今回は言語を日本語に指定するパラメータ「hl=ja」を記述し、Google検索(google.com)を指定します。
その後、write()関数を使用します。括弧内には引数,パラメーターとして、検索バーに入力するキーワードを渡します。(指定されたテキストをアクティブウィンドウに入力。)
渡した後、press()関数を使用します。括弧内には引数,パラメーターとして今回は「ENTER」と記述し、ENTERキーを渡します。(自動で押すキーまたはキーの組み合わせ。)
これでGoogle検索で検索を行い、結果結果をWebブラウザのウインドウに表示させることができます。
■実行
このスクリプトを「hel_web_2.py」という名前で保存し、コマンドプロンプトから実行してみます。
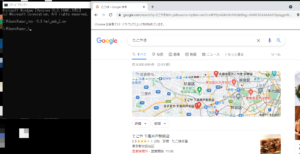
実行してみると、Webブラウザ(GoogleChrome)が自動的に起動し、Google検索にアクセス。アクセス後、検索バーにキーワードを入力し、ENTERキーを押して検索が実行され、検索結果を表示させることができました。




コメント