
GitHub CLIのインストールからログインまでを解説します。
■PC環境
macOS High Sierra バージョン10.13.6
■インストール
まず、Homebrew(ホームブルー)をインストールを行います。
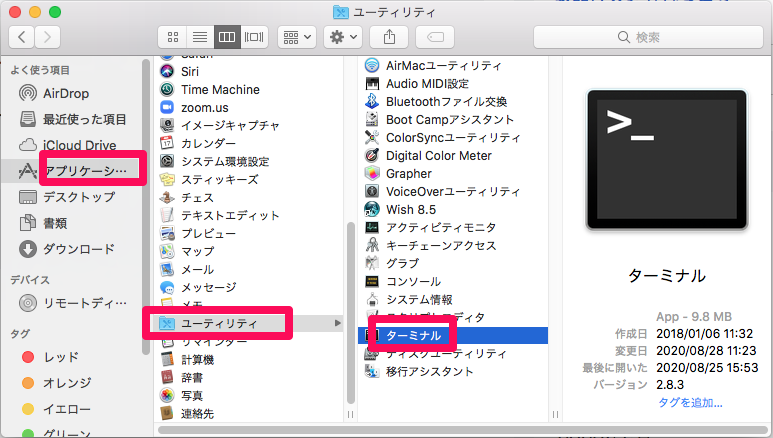
インストール後、「アプリケーション」→「ユーティリティ」→「ターミナル」をクリックし、起動します。
$ brew install gh
起動後、上記のコマンドを入力し、Return/Enterキーを押します。
Updating Homebrew...
==> Auto-updated Homebrew!
Updated 1 tap (homebrew/core).
==> New Formulae
alsa-lib                   libfs                      matplotplusplus
arturo                     libgccjit                  mhonarc
asroute                    libhandy                   nicotine-plus
blaze                      libice                     numcpp
borgbackup                 libirecovery               openfst
box2d                      libmnl                     openjdk@8
castget                    libnetfilter-queue         or-tools
cdktf                      libnfnetlink               ormolu
clang-format@8             libpciaccess               parallel-hashmap
cli11                      libpthread-stubs           periscope
cloudformation-guard       libseccomp                 pickle
commitizen                 libslirp                   podman
croc                       libsm                      postgresql@12
cvs-fast-export            libx11                     prometheus-cpp
dbdeployer                 libxau                     protoc-gen-go-grpc
device-mapper              libxaw                     protoc-gen-gogo
diskonaut                  libxaw3d                   protoc-gen-gogofaster
dotnet                     libxcb                     python@3.9
envoy                      libxcomposite              rain
fleet-cli                  libxcursor                 rustscan
flit                       libxdamage                 server-go
fnm                        libxdmcp                   shtools
font-util                  libxext                    sleef
foreman                    libxfixes                  snap
fpart                      libxfont                   sponge
gcalcli                    libxft                     structurizr-cli
git-hound                  libxi                      taskwarrior-tui
gitlint                    libxinerama                terrascan
gitql                      libxkbfile                 tfsec
go@1.14                    libxmu                     trunk
googletest                 libxpm                     usb.ids
gost                       libxrandr                  util-macros
halide                     libxrender                 vint
httpx                      libxres                    vivid
infracost                  libxscrnsaver              volk
inja                       libxshmfence               vtk@8.2
ioctl                      libxt                      webify
isort                      libxtst                    wownero
ladspa-sdk                 libxv                      x86_64-elf-gdb
leaf                       libxvmc                    xcb-proto
libaio                     libxxf86dga                xdpyinfo
libdmx                     libxxf86vm                 xorgproto
libdrm                     localstack                 xtrans
libfontenc                 mariadb@10.4               zsh-you-should-use
==> Updated Formulae
Updated 3128 formulae.
==> Renamed Formulae
gst-validate -> gst-devtools
==> Deleted Formulae
llvm@6              meson-internal      woboq_codebrowser   xu4

==> Downloading https://homebrew.bintray.com/bottles/gh-1.1.0.high_sierra.bottle.tar.gz
==> Downloading from https://d29vzk4ow07wi7.cloudfront.net/9c01ec1dcf9c2b4304997ecf655c7f5aacbb30
######################################################################## 100.0%
==> Pouring gh-1.1.0.high_sierra.bottle.tar.gz
==> Caveats
Bash completion has been installed to:
  /usr/local/etc/bash_completion.d

zsh completions have been installed to:
  /usr/local/share/zsh/site-functions
==> Summary
🍺  /usr/local/Cellar/gh/1.1.0: 60 files, 16.4MB
==> `brew cleanup` has not been run in 30 days, running now...
Removing: /Users/user/Library/Caches/Homebrew/openssl@1.1--1.1.1g.high_sierra.bottle.tar.gz... (5.4MB)
Removing: /Users/user/Library/Caches/Homebrew/python@3.8--3.8.5.high_sierra.bottle.tar.gz... (16.6MB)
Removing: /Users/user/Library/Caches/Homebrew/sqlite--3.32.3.high_sierra.bottle.tar.gz... (1.9MB)
Removing: /Users/user/Library/Logs/Homebrew/gdbm... (68B)
Removing: /Users/user/Library/Logs/Homebrew/openssl@1.1... (68B)
Removing: /Users/user/Library/Logs/Homebrew/python@3.8... (3 files, 172.3KB)
Removing: /Users/user/Library/Logs/Homebrew/readline... (68B)
Removing: /Users/user/Library/Logs/Homebrew/sqlite... (68B)
Removing: /Users/user/Library/Logs/Homebrew/xz... (68B)
Pruned 1 symbolic links and 4 directories from /usr/local
Return/Enterキーを押すと、上記のようにインストールが開始され、完了となります。
gh issue list
完了後、インストールされたかどうかの確認のために、試しでコマンドを入力し、Return/Enterキーを押します。
Welcome to GitHub CLI!

To authenticate, please run `gh auth login`.
You can also set the GITHUB_TOKEN environment variable, if preferred.
押すと、「Welcome to GitHub CLI!」と表示されます。これでGitHub CLIがインストールされていることが確認できました。
■認証を行いログインする
$ gh auth login
確認ができましたので、次に認証を行いますので、上記のコマンドを入力し、Return/Enterキーを押します。
? What account do you want to log into? [Use arrows to move, type to filter]
> GitHub.com
GitHub Enterprise Server
押すと、「What account do you want to log into?(どのアカウントにログインしますか?)」と質問されます。今回は「GitHub.com」のアカウントにログインするので、矢印キーで「GitHub.com」を選択し、Return/Enterキーを押します。
? How would you like to authenticate?  [Use arrows to move, type to filter]
> Login with a web browser
  Paste an authentication token
押すと、「How would you like to authenticate?(認証方法を選択してください。)」と質問されます。今回は「Login with a web browser(Webブラウザでログインする)」を矢印キーで選択し、Return/Enterキーを押します。
! First copy your one-time code: ○○○○-○○○○
- Press Enter to open github.com in your browser...
押すと、「First copy your one-time code(ワンタイムコードを最初にコピーする)」という指示が表示され、「Press Enter to open github.com in your browser…(Enterキーを押して、ブラウザでgithub.comを開きます…)」と書かれていますので、ワンタイムコードをコピーして、Return/Enterキーを押します。
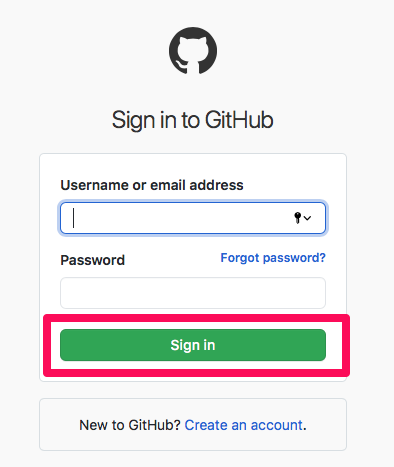
押すと、Webブラウザが起動し、github.comのログインページが表示されます。表示後、「Username or email address」に既に取得しているgithubのアカウント名(ユーザー名)か取得の際に使用したメールアドレスを入力します。その後、「パスワード(Password)」を入力し、「Sign in」ボタンをクリックします。

クリックすると、「Device Activation(デバイスアクティベーション)」と書かれたページが表示されます。こちらで先程、発行されたワンタイムコードを入力し、「Continue(続行)」ボタンをクリックします。
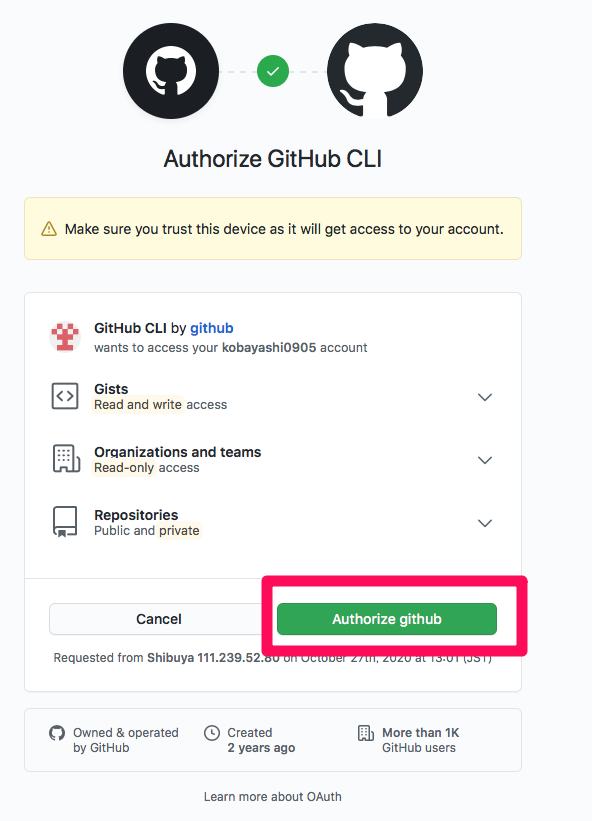
クリックすると、「Authorize GitHub CLI(GitHub CLIの承認)」と書かれたページが表示されます。「Make sure you trust this device as it will get access to your account.(このデバイスを信頼してください。このデバイスはアカウントにアクセスできるようになります。)」と書かれていますので、「Authorize github(githubの許可)」ボタンをクリックします。

クリックすると、「Congratulations, you’re all set!(おめでとうございます、準備完了です!)」と書かれたページが表示されます。「Your device is now connected.(デバイスが接続されました。)」と書かれていますので、これで認証は完了となります。
✓ Authentication complete. Press Enter to continue...
完了後、Macのターミナル画面に戻ります。戻ると「Authentication complete. Press Enter to continue…(認証完了。続行するにはEnterキーを押してください…)。」と表示されています。
続行するために、Return/Enterキーを押します。
? Choose default git protocol  [Use arrows to move, type to filter]
> HTTPS
  SSH
押すと、「Choose default git protocol(デフォルトのgitプロトコルを選択する)」と質問されます。今回は「HTTPS」を矢印キーで選択し、Return/Enterキーを押します。
? Choose default git protocol SSH
- gh config set -h github.com git_protocol ssh
✓ Configured git protocol
✓ Logged in as ○○○○(ユーザー名)
押すと、「Configured git protocol(構成済みのgitプロトコル)」と表示されて、「○○○○(ユーザー名)としてログインしました。(Logged in as ○○○○(ユーザー名))」と表示されます。これでログインは完了となります。

コメント