
VirtualBoxのインストールと、Vagrantをインストールしましたので、CentOS7を動かしてみます。
Vagrantをインストールし、CentOS7を動かす場合は、Vagrant CloudのBoxを利用することで、CentOS7を動かすことができます。
まず、Windows10の検索ボックスで「cmd」と検索して「コマンドプロンプト」を起動します。
■Vagrantの初期化、Vagrantfileの作成を行う
vagrant init centos/7
「コマンドプロンプト」を起動後、vagrant initを入力してBoxの追加、初期化と、centos/7のディレクトリを作成し、このディレクトリにVagrantfileを作成し配置します。入力後、Enterキーを押します。
A `Vagrantfile` has been placed in this directory. You are now
ready to `vagrant up` your first virtual environment! Please read
the comments in the Vagrantfile as well as documentation on
`vagrantup.com` for more information on using Vagrant.
Enterキーを押すと、Vagrantfileはディレクトリに配置され、仮想環境の準備ができたというメッセージが表示されます。
■Vagrantの起動を行う
仮想環境の準備ができたので、次にVagrantの起動を行います。
vagrant up
起動を行う際は、上記のコマンドを入力し、Enterキーを押します。
Bringing machine ‘default’ up with ‘virtualbox’ provider…
==> default: Box ‘centos/7’ could not be found. Attempting to find and install…
default: Box Provider: virtualbox
default: Box Version: >= 0
==> default: Loading metadata for box ‘centos/7’
default: URL: https://vagrantcloud.com/centos/7
==> default: Adding box ‘centos/7’ (v2004.01) for provider: virtualbox
default: Downloading: https://vagrantcloud.com/centos/boxes/7/versions/2004.01/providers/virtualbox.box
Download redirected to host: cloud.centos.org
default:
default: Calculating and comparing box checksum…
==> default: Successfully added box ‘centos/7’ (v2004.01) for ‘virtualbox’!
==> default: Importing base box ‘centos/7’…
==> default: Matching MAC address for NAT networking…
==> default: Checking if box ‘centos/7’ version ‘2004.01’ is up to date…
==> default: Setting the name of the VM: user_default_1595890831800_11056
==> default: Clearing any previously set network interfaces…
==> default: Preparing network interfaces based on configuration…
default: Adapter 1: nat
==> default: Forwarding ports…
default: 22 (guest) => 2222 (host) (adapter 1)
==> default: Booting VM…
==> default: Waiting for machine to boot. This may take a few minutes…
default: SSH address: 127.0.0.1:2222
default: SSH username: vagrant
default: SSH auth method: private key
default:
default: Vagrant insecure key detected. Vagrant will automatically replace
default: this with a newly generated keypair for better security.
default:
default: Inserting generated public key within guest…
default: Removing insecure key from the guest if it’s present…
default: Key inserted! Disconnecting and reconnecting using new SSH key…
==> default: Machine booted and ready!
==> default: Checking for guest additions in VM…
default: No guest additions were detected on the base box for this VM! Guest
default: additions are required for forwarded ports, shared folders, host only
default: networking, and more. If SSH fails on this machine, please install
default: the guest additions and repackage the box to continue.
default:
default: This is not an error message; everything may continue to work properly,
default: in which case you may ignore this message.
==> default: Rsyncing folder: /cygdrive/c/Users/user/ => /vagrant
Enterキーを押すと、起動が開始されます。起動となりますが、今回使用したWindows10環境には、無料セキュリティソフト「アバスト」がインストールされています。
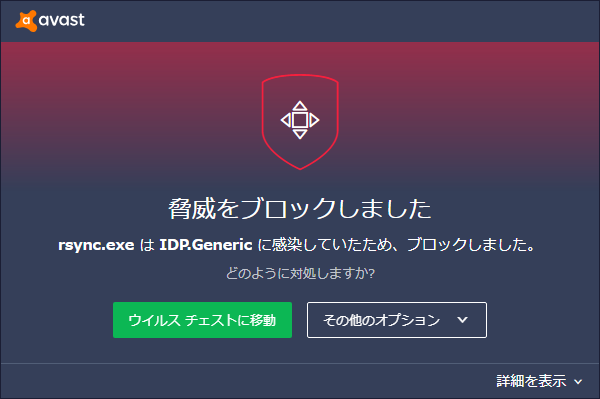
アバストをインストールしていると、いくつか「脅威をブロックしました」というウインドウが表示されますので、「その他のオプション」で例外設定を行い、起動を進めます。
「default: Rsyncing folder: /cygdrive/c/Users/user/ => /vagrant」と表示されれば起動は完了となります。
■Vagrantにログインする
完了後、コマンドプロンプトを閉じてみます。閉じた後、再度コマンドプロンプトを起動します。
vagrant ssh
起動後、上記のコマンドを入力しEnterキーを押して、Vagrantにログインを試みます。
[vagrant@localhost ~]$
Enterキーを押すと、「vagrant@localhost」という表示になりました。これでログインが完了しました。念のため、CentOS7が動いているか確認します。
cat /etc/redhat-release
確認するために、上記のコマンドを入力し、Enterキーを押します。
CentOS Linux release 7.8.2003 (Core)
Enterキーを押すと、CentOSのバージョンが表示され、ちゃんと動いていることが確認できました。

コメント